Security and Permissions
GeoNode has the ability to restrict the access on your layers, maps, and documents to other users or group of users.
This section should help you to understand which restrictions are possible and what to take care of while using them.
Generally permissions can be set on all your uploaded data. Here´s an overview:
- Users
- Superuser permissions
- Django admin interface permissions
- Groups
- Public
- Public (invite only)
- Private
- Layers
- View a layer
- Download a layer
- Change metadata for a layer
- Edit layer’s features
- Edit styles for a layer
- Manage a layer (update, delete, change permissions, publish/unpublish it)
- Maps
- View a map
- Download a map
- Change metadata for a map
- Manage a map (update, delete, change permissions, publish/unpublish it)
- Documents
- View a document
- Download a document
- Change metadata for a document
- Manage a document (update, delete, change permissions, publish/unpublish it)
To understand how this permissions can be set, you first have to know about the different kinds of users.
Permissions and GeoNode objects
Users
GeoNode has two types of users:
- Unregistered users (anonymous)
- Registered users
An unregistered user is someone who is just visiting the site, but doesn’t have any data uploaded yet. A registered user has already done that. But there are even more kinds of registered users! A registered user can have one or more of those three status:
- Superuser
- Staff
- Active
A superuser is usually generated directly after the installation of GeoNode via the terminal. When creating a superuser through the terminal it always has the status active and the status staff as well. It is also important to know that a superuser is a user that has all permissions without explicitly assigning them! That means that he is able to upload and edit layers, create maps etc. and can not be restricted from that! So the superuser is basically the administrator, who knows and has access on everything.
The status staff only implies that a user with this status is able to attend the Django Admin Interface. Active has no special meaning, it only says that there is a user and it is available. Instead of deleting this user, you could just unset the status active, your user will still be remaining, but it won´t show up.
There are several options to create a user:
- From the terminal: Here you can only create a superuser
- From the GeoNode interface (when GeoNode registration are open): A normal user will be created by signing up to GeoNode. It only has the status active so far!
- From the GeoNode interface (when GeoNode registration are closed): A superuser will be able to invite a user
- From the Django administrative interface: a new user can be created as well as the status of an already existing user can be changed, e.g make a generic user a superuser.
Groups
In GeoNode you can assign permissions to groups, all the users that belong to the group will inherit its permissions.
If you are an administrator you can create a group in the dedicated tab and invite or assign users to it. The group will be available in the permissions widget in geonode and you will be able to assign object permissions to it.
Layers
As mentioned above, a superuser or the layer owner or a user with management permissions on the layer should be able to restrict other users from the layer itself.
Generally there are the following types of permissions:
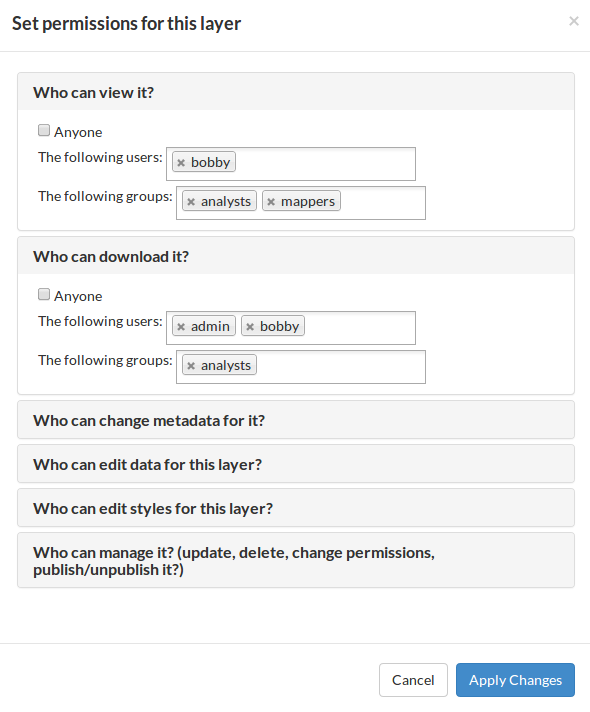
These are permissions that is possible to assign to a GeoNode layer:
- Who can view the layer
- Who can download the layer
- Who can change the metadata of the layer
- Who can edit data of the layer
- Who can edit styles of the layer
- Who can manage the layer (update, delete, change permissions, publish/unpublish it)
Each of these permissions can be assigned to:
- Anyone (only for who can view and download)
- One or more users
- One or more groups
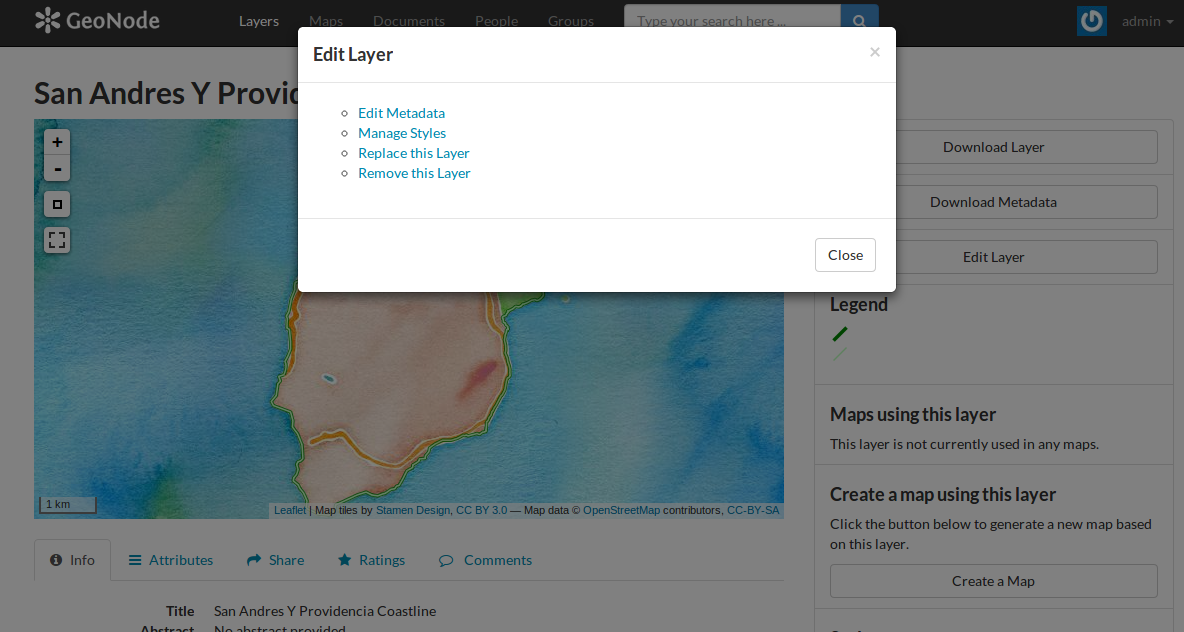
A user with all of these permissions in the layer detail page will have a button to download the layer, a button to download its metadata, a button to change the layer permissions and an edit button that will display links to:
- Edit metadata
- Edit styles
- Manage styles
- Replace the layer
- Remove the layer
This can also be seen here:
If the layer is vectorial the user will be able also to edit the layer’s features in a GeoNode map (the “Edit” tool should be enabled).
Now take a closer look on to the section Edit Metadata. All the following things can be edited in the metadata section:
- Owner
- Title
- Date
- Data type
- Edition
- Abstract
- Purpose
- Maintenance frequency
- Keywords region
- Restrictions
- Restrictions other
- Language
- Category
- Spatial representation type
- Temporal extent start
- Temporal extent end
- Supplemental information
- Distribution URL
- Distribution description
- Data quality statement
- Keywords
- Point of contact
- Metadata author
- Attributes (those can though not be changed!)
Maps
Generally all the same applies to maps, but with fewer options:
- Who can view the map
- Who can download the map
- Who can change the metadata of the map
- Who can manage (delete, change permissions, publish/unpublish it, set map thumbnail)
The section Edit metadata is almost the same as for layers, with two more options:
- Metadata XML
- Thumbnail
In Set map thumbnail the thumbnail of the map can be set.
Documents
The same permissions that can be used on layers can be used on the documents, with the exception of the edit data and edit styles permissions.
Require authentication to access GeoNode
By default, unregistered users cannot view maps, layers, and documents on your site without being authenticated. GeoNode comes
a security option that requires users to authenticate before accessing any page. To enable this option, set the LOCKDOWN_GEONODE
setting to true in your settings.py file. You can fine-tune which url routes are white-listed (accessible by unregistered
users) by listing the routes in the AUTH_EXEMPT_URLS tuple. See the GeoNode Django Apps documentation for more information.
Publishing and unpublishing objects
By default GeoNode does not implement any kind of mechanism to publish/unpublish resources such as layer, maps and documents.
Setting the RESOURCE_PUBLISHING to True such a workflow is used, and by default new uploaded resources are unpublished.
It is possible for any GeoNode staff member that has permissions on the base/ResourceBase model to decide to publish/unpublish a layer, map or document.
The staff member can go to the resource base Django admin page, and publish or unpublish the resource by checking or unchecking the is_published field:

When the resource is unpublished, it will be not available to any user, including administrators, in the GeoNode site. If the unpublished resource is a layer it will be considered in the GetCapabilities generated by GeoServer.
The unpublished resource will not be reachable by anyone using GeoNode search features. The only way to access to it is by the Django admin site, from where it will be eventually possible to publish again the resource by a staff member, or from the layer details page, accessible by any user with the publish_resourcebase permission on that layer.